28: The respiratory system eis
In this lesson, you learned all about how negative pressure allows you to pull in the air from the external environment. This activity will have you build a model of the lungs and diaphragm that demonstrates this principle in action.
materials
- 3 latex balloons. Ideally, 2 should be small and one should be a bit larger.
- A plastic straw.
- A plastic bottle with a cap.
- Hot glue or superglue is helpful but not mandatory.
- Tape.
- Scissors.
- A drill or ice pick to make a hole in the bottle cap.
procedure
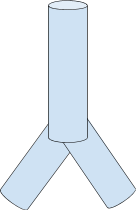
1. Cut a straw into 3, 2-3 inch pieces. Cut one of the straws down the middle, vertically, about a half inch up to make a bifurcation:
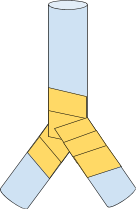
2. Fit each of the other two straws onto either part of the bifurcation to make a Y shape.
3. Tape all around the bifurcation of the Y so that there are no holes and it is completely sealed off from the air.
4. Fit a balloon (the two smaller balloons, if you have different sizes) onto the end of each of the bottom straws. You may wish to secure them in place with glue or tape.
5. Cut the bottom off of a plastic bottle. Save the top half.
6. Fit the straw with the balloons through the bottom of the bottle so that the top of the straw comes out of the top of the bottle.
7. Drill a hole in the bottle cap, large enough to fit the straw tightly through. Always use caution and get the permission of your relevant responsible adult before using tools.
8. Fit the top of straw (that part without the balloons) through the hole in the cap lid. You may wish to secure it in place and fill in any gaps with glue.
9. Secure the cap lid onto the bottle.
10. Cut the top (the part without the opening) off of the 3rd (larger) balloon and save the bottom (part with the opening). Tie off the opening.
11. Fit the wide part of the cut balloon over the bottom opening of the cut water bottle. You may wish to secure it in place with glue or tape.
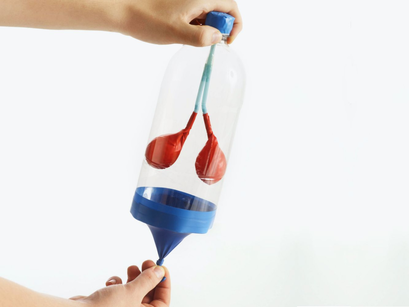
12. Your final product should look like this:
13. Pull on the knot of the balloon to expand the volume inside of the bottle. What happens to the balloons inside of the bottle?
If you’re proud of your finished product, or you’re having fun, we want to see it! If you have an Instagram and the permission of your relevant responsible adult, share with us @eons_learning, #LungsEons.
If you’re proud of your finished product, or you’re having fun, we want to see it! If you have an Instagram and the permission of your relevant responsible adult, share with us @eons_learning, #LungsEons.
Longitudinal Activity: Making a Model of the Human Body
Add the following features to your model of the human body:
You can use your model made in this activity, or, if you’re already set on the design, you can make a different one.
- Lungs
- Diaphragm
- Trachea
- Bronchi
You can use your model made in this activity, or, if you’re already set on the design, you can make a different one.


