EIS 3: Precipitation and Naming Molecular Compounds
This lesson will introduce you to precipitation chemistry, which is where you add two different ions to a solution, and they react to form a precipitate. A precipitate is a solid that is not soluble in water. It can be colored, but won’t always be (in which case it would be white). An example of an ionic compound that is soluble (i.e., would not precipitate) is sodium chloride (NaCl or table salt—I’m sure you’ve noticed that this dissolves easily in water). An example of an ionic compound that is not soluble (i.e., would precipitate) is magnesium oxide (MgO). Here’s what magnesium oxide would look like as it precipitates from a solution:
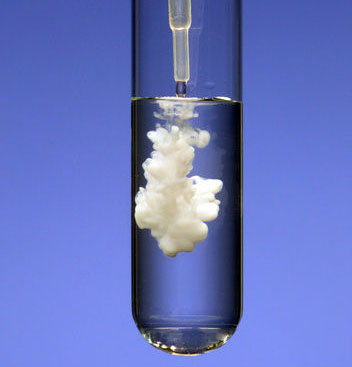
Eventually, all of the white would sink to the bottom of the test tube and it would just look like an opaque (not see through) white solution.
Side note: precipitation reactions can be really pretty. Here’s a video:
Side note: precipitation reactions can be really pretty. Here’s a video:
In the virtual laboratory, you will have the opportunity to mix different solutions together to see if they would form precipitates. You will then be asked to name the precipitate that forms, providing both the long name AND the chemical formula given only the solutes that are in solution.
We have included some transition metals and other metals you haven’t learned before. The naming for these is basically the same as the ionic nomenclature you’ve learned already. One more thing gets added to the name, but we’re not going to worry about that—I wouldn’t have used these cations at all, except it turns out that they’re the most interesting in terms of precipitation. For the purposes of this lab, you may just name these compounds the exact same way that you would name any other ionic compound. When you make the compound, we will also give you the fully correct name (regardless of whether or not a precipitate forms). If you put this on your answer sheet for the transition metals, it is also correct (so long as the precipitate did, in fact, form).
(Note: In reality, some things are soluble under certain conditions but not others, and factors like temperature readily affect the degree of solubility of something in a solution. For this experiment, that means that some of the precipitates that are soluble here and therefore do not precipitate would actually form some precipitate under slightly different conditions.)
Procedure
1. Go to the lab!
2. Print out this table so that you can fill it in as you go (you can also fill it in electronically in a PDF editor or something similar, if you like):
2. Print out this table so that you can fill it in as you go (you can also fill it in electronically in a PDF editor or something similar, if you like):
| Precipitation Reactions Table Download! |
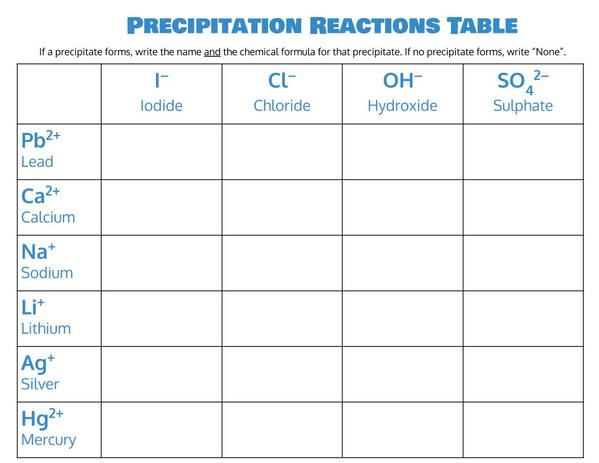
3. Using the following table as your guide, combine each of the cations with each of the anions. See if a precipitate forms, and write down the color of the precipitate in your table (be sure to leave room for other things as well).
4. If a precipitate forms, record in the box the name of the precipitate. If no precipitate forms, write “NR” for “no reaction”.
5. Answer the accompanying questions.
If you have the supplies available, you can also try this simple at-home precipitation reaction.
- In the module, a precipitate will look like white or colored circles sinking to the bottom of solution.
- No reaction will look like nothing (liquid with no colored circles).
- Hit the green flag in the top right corner of the module to return to the home screen and start a new reaction. Hit the stop sign to exit the module.
4. If a precipitate forms, record in the box the name of the precipitate. If no precipitate forms, write “NR” for “no reaction”.
- Put both the full name (e.g., sodium chloride) and the chemical formula (e.g., NaCl).
5. Answer the accompanying questions.
If you have the supplies available, you can also try this simple at-home precipitation reaction.
Materials
- Epsom salt (magnesium sulphate)
- Liquid soap
- Water
- 2 cups/glasses
Procedure
1. Make a solution of Epsom salt in one of your cups/glasses. This should be about 1 tablespoon of Epsom salt per cup of water. The exact amount does not have to be precise.
2. Make a solution of soapy water in the other cup/glass. The reaction will be easiest to see if you use a clear cup and fill it no more than about halfway. It should be enough soap to make the water a bit sudsy. This is roughly ½ - 1 tablespoon of soap per cup of water, but the exact amount does not have to be precise.
3. Slowly pour some of the Epsom salt solution into the soapy water. You should see a precipitate start to form!
If you have an Instagram and the permission of your relevant responsible adult, we’d love to see a video of your precipitation reaction! Share with us @eons_learning, #PrecipitationEons.