EIS 11: Scale Models
Materials
- Household materials and/or craft store materials of your choice. You will be making a scale model of the Earth. I encourage you to do the math BEFORE deciding what materials you will use.
Procedure
For this activity you will be creating a scale model of the Earth’s layers. A scale model is something that represents the earth, but is a lot smaller. It still keeps the proportions of the real Earth, though. In other words, the crust will be really thin, and the mantle will be a lot thicker, like they are in the real Earth.
You can use whatever materials you like, and the model can be as big or as small as you like. Note that the smaller you make it, the more difficult it will be to accurately measure the smallest objects, and the larger you make it, the more cumbersome it will be and the more space it will take up in your house. I encourage you to explore the different sizes that you could make the different layers and have all of the numbers calculated before you actually start making your scale model.
You only have to round each of your digits to the one significant figure. Zeros don’t count as significant, unless it’s after a decimal point. That means if something is supposed to be 4.88 cm, you can make it 5. If it is supposed to be 5.000 cm, that’s 5. If it’s supposed to be 12.5, 10 is fine. If it’s supposed to be 225.340, 200 is fine.
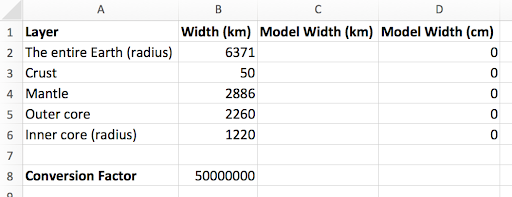
These are the radius/width values we will be using. Remember, radius is half of diameter. Diameter is how far across a circle is from one side to one side. Radius is how far it is from the center to one side. You should include all of the layers listed in this chart. If you want to try to add surface detail, you can, but you don’t have to (and it would probably be pretty small if you did).
Layer |
Width |
The entire Earth (radius) |
6371 |
Crust |
50 |
Mantle |
2886 |
Outer core |
2260 |
Inner core (radius) |
1220 |
You should be a pro at making scale models by now since you just made a scale map, but, if you need, here’s a reminder of how to do the math:
You can calculate all of these by hand if you like. But, this is also a great opportunity to teach you about using functions in Excel.
You should already know the basics of inputting data into Excel from your Thermal Expansion EIS. You should also have a program you can use. These include Microsoft Excel, Apple Numbers, and Google Sheets. Functions work the same way in all of these programs, so it doesn’t matter which one you are using.
The first thing you want to do is input the actual thickness/radius values from the table above. Then, make a 3rd column heading for the size of your scale model. To make things simple, we will leave this one in km. Most of you will be making a model on the scale of cm. You will probably find it useful to make a fourth column for the size of your scale model in cm.
Functions work by letting you do math to whatever value (number) is in a cell (box). You can easily change the function to do different math to the same number. You can also easily change the number to do the same math to a different number. This makes things a lot easier and faster compared to calculating everything by hand, if you know how to use them.
The first function we will do is easy: converting km to cm. There does not have to be anything in a cell for you to start a function. It might say something like #DIV/0 as a result if you do this. No need to worry, this will update to the correct value as soon as you put something in the cell.
1 km = 100,000 cm. So, whatever km value we have we will have to MULTIPLY by 100,000 to get the cm value. If this doesn’t make sense to you, try doing the math on paper first. It should also make sense that you should have more cm in any particular length, because cm are tiny compared to km.
Now for using the function. We know that whatever the value is in km, for a particular layer of the Earth, will be in this box (the one with the green box around it):
We want the value in cm to be in this box:
We put the formula in the box we want the calculated value to be in. That’s the box highlighted in the picture just above (D2).
To start a formula, type an equal sign (=). This lets the cell know you are calculating something instead of typing a value. Then, select the box that your reference value (that’s the number you’re doing the calculation to, which in this case is the km value) is in. You should notice the formula update with the cell reference for that cell (in this case, C2, because it is in column C and row 2).
It should look like this:
Now, we can do math to C2. Remember, we want to multiply by 100,000. On computers, multiply is the asterisk (*) key, which you get to by typing shift 8. The cell should read =C2*100000.
Click enter to get out of the cell. If you try to click out, it will add a new cell reference instead of actually getting you out of the cell.
The cell should read 0 for now. A blank cell is registered as a 0 to Excel.
The cell should read 0 for now. A blank cell is registered as a 0 to Excel.
Note that if I type something in C2, the calculation will automatically update in D2.
I’m going to delete this value because it’s meaningless. Just click the cell and use the delete/backspace key to clear it.
Now is where the magic of Excel comes into play: applying the same formula to lots of different values. We want to convert km to cm for ALL of our values, regardless of which layer of the Earth we’re talking about. I can easily do this by dragging the formula to a new cell.
The bottom right corner of the cell has a square. Hover your mouse over that square until you see a black plus sign. Then, click the square and drag your mouse down to all the cells that you want your formula to be in.
The bottom right corner of the cell has a square. Hover your mouse over that square until you see a black plus sign. Then, click the square and drag your mouse down to all the cells that you want your formula to be in.
There will now be zeros in all of the cells. But, if you double click on the cell, you will see that the formula for D3 refers to C3, D4 to C4, and so on. This is exactly what we want. In other words, the width in cm for the crust will be calculated from the width in km for the crust, mantle for mantle, and so on.
If I type different numbers in all of the cells, I will get the same calculation, but different results, in the D column.
Once you get the hang of it, doing calculations this way will save you a lot of time because you don’t have to repeat the same thing a lot of times. The computer does that for you. Amazing, right?
Now that you have the basics down, we can move on to the main calculation: determining what the width in the model will be.
To do this, we have to choose a scale. We definitely want the model to be smaller than the actual Earth, so we will be dividing (that’s the / sign on the keyboard, which is next to the right side shift key). By how much is up to you: it depends on the size you want your model to be. Experiment with a few values before you find one you think is a good size.
Because calculations work so quickly, you have the opportunity to play around with things and do some trial and error. For example, I could try dividing by 50 first:
And I can see that my model would be WAY too big: The entire earth would be 12742000 cm. So we can try 5000. Be sure to drag the formula down every time you change it. It won’t update every cell automatically.
Still too big. Just keep changing the number until you find one you like.
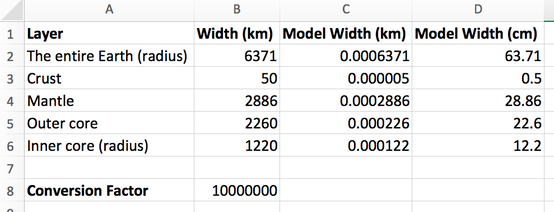
I like 50,000,000. That’s about a foot diameter for the whole thing (remember, the diameter is 2x the radius: you can make another column for this in your spreadsheet, if you like), or about the size of a basketball. Plus, my crust isn’t too small: that’s about the size of a thin piece of foam or a thick piece of construction paper.
I like 50,000,000. That’s about a foot diameter for the whole thing (remember, the diameter is 2x the radius: you can make another column for this in your spreadsheet, if you like), or about the size of a basketball. Plus, my crust isn’t too small: that’s about the size of a thin piece of foam or a thick piece of construction paper.
If you’d like, there is a trick to changing the conversion factor (the number you’re dividing by) without updating the formula. Make a new cell called “Conversion factor”. Put whatever conversion factor you like in it.
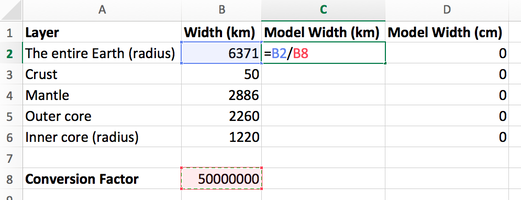
Let’s go back to type the formula in C2. This time, instead of dividing by 50,000,000, divide by B8 (conversion factor): type =, click B2, type /, click B8, hit enter to exit.
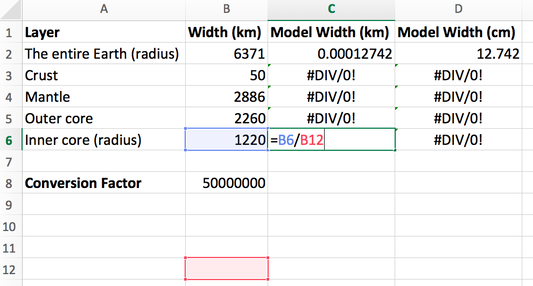
Note that when you try to drag this formula down, BOTH B2 and B8 change. In other words, you are no longer referring to “Conversion factor” when you divide. You are now referring to an empty cell, which is 0. So, the computer thinks you’re trying to divide by 0 (#DIV/0), which is a big no-no.
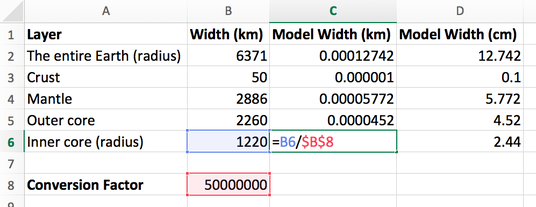
What we want to do is create what is called a “fixed reference”. This is pretty easy. Simply put dollar signs ($) in front of both the column and the row in the reference you are trying to fix. Now when you drag down the formula, the non-fixed reference (B2-6) will update, but the fixed reference ($B$8) will stay put.
Now every cell will update automatically when you change the conversion factor.
This might seem kind of complicated for a shortcut, but, like everything in Excel, it becomes super useful and could save you a lot of time once you get the hang of it.
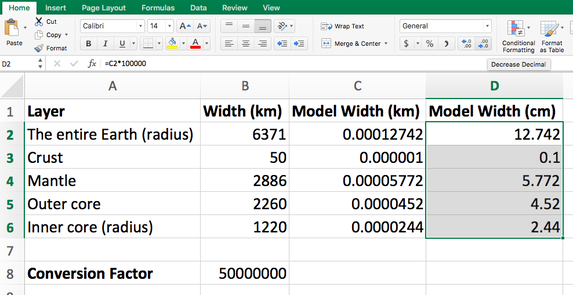
Lastly, we want to format our results. Excel isn’t very good about letting you format based on significant figures (unless you switch to scientific notation, which is more complicated than we need it to be), but we can very easily change the number of decimal points. You don’t have to do this, but it might help with rounding. Simply highlight the cells you want to format and hit the “decrease decimal” button in the home bar.
Lastly, we want to format our results. Excel isn’t very good about letting you format based on significant figures (unless you switch to scientific notation, which is more complicated than we need it to be), but we can very easily change the number of decimal points. You don’t have to do this, but it might help with rounding. Simply highlight the cells you want to format and hit the “decrease decimal” button in the home bar.
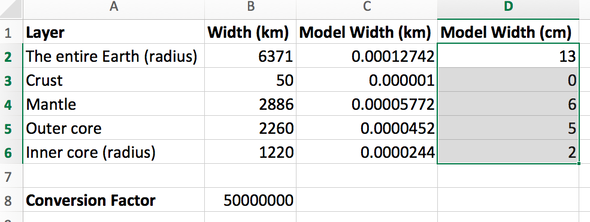
Do this until there are no decimal places (we don’t need much specificity for this project).
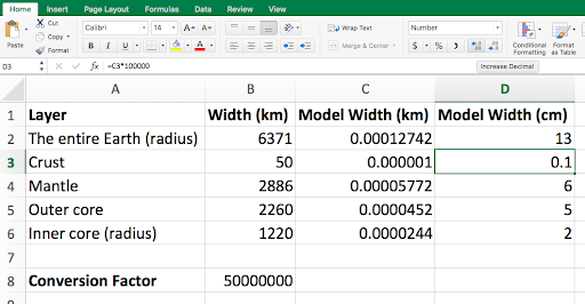
Then click “Increase decimal” if the cell reads 0, until you get a non-zero number.
Now we don’t have too many unnecessary decimal points hanging around. Beautiful! Again, this is just to make it pretty, but it also might be helpful to you.
Once you’ve done your math, make your model. Measure everything carefully to try to get it to the right size. Remember, you want it to be accurate to 1 significant figure (so, in our example, the entire Earth could have a radius of about 10-15 cm). Then, answer the associated questions.
If you are proud of your model, we want to see it! If you have an Instagram and the permission of your relevant responsible adult, share with us @eons_learning, #EarthEons


