eis 27: cardiovascular system
Activity 1: Modeling Blood
Your blood is pretty important, and it does a lot. Think about it: it has to carry oxygen and nutrients to and remove wastes from every single cell in your entire body! On top of that, it is the communication network that allows cells to send hormones all over the body to keep everything running smoothly under a variety of different circumstances. If that wasn’t enough, it’s also responsible for keeping your body safe from infection by getting immune cells where they need to go! That’s a lot of jobs!
For all these functions, blood has a lot of structures in it. You may not always think of blood having a “structure,” because it just looks like a red liquid. But, on a microscopic scale, that red liquid has a ton of stuff going on in it. It has red blood cells, which carries oxygen via the protein hemoglobin; white blood cells, which are your immune cells that attack invading pathogens (like viruses and bacteria); platelets, which clot your blood if you get hurt; proteins, like albumin, which help to transport various things that don’t dissolve in water that well, like hormones, some vitamins, and fats; lots of dissolved molecules like ions, glucose, amino acids, and bicarbonate, which is how your body transports most carbon dioxide and also how your blood maintains its pH; and a whole lotta water to keep all that stuff flowing.
In this activity, you’ll be making a model of all the stuff that’s in blood. You’ll have some leeway on what exactly to use, but we’ll define some constraints so that you can also use this blood in the next activity.
materials
You’ll need something to model each of the following. All objects should be things that maintain their structural integrity in water:
You’ll also need a resealable container to put these items in, such as a clear bottle.
- Red blood cells: The diameter of this should be about the size of a dime. Pebbles, beads, and craft-store gems all work well. Larger dried beans, like lima beans or chickpeas, also work well. Some people also like to use candy, but note that this may dissolve in water within a few days. We recommend getting something red so that you remember what each component is.
- White blood cells: The diameter of this should be about the size of a quarter. We recommend getting something white.
- Platelets: These should be bigger than your proteins (see next) but smaller than your red blood cells. Small beads, uncooked rice, dried beans, broken up dried pasta shells, and small rocks/gravel all work well. We recommend getting something clear or white.
- Proteins/albumin: These should be pretty small: somewhere between the size of a grain of sand and the size of grain of rice. Sand, rice, tiny beads, and glitter all work well. If you’d like, you can use different colors to represent different proteins.
- Ions and glucose: These should be very small. Actual sugar and salt work great!
- Plasma: Water works great. You can also add food coloring if you want. Real plasma has a slight yellow-ish tint to it due to the various dissolved particles. You can also use red if you want it to look more like blood.
You’ll also need a resealable container to put these items in, such as a clear bottle.
procedure
1. Challenge: This step isn’t mandatory, but if you’d like an extra level of challenge, calculate the exact sizes of the objects needed in your model and find something that works accordingly. If you’d like a reminder on how to use Excel to calculate these numbers, refer to the EIS 11: Layers of the Earth. Here are the real sizes of the components in your system:
|
2. Create “plasma” by mixing water, salt, sugar (or your other model of ions and glucose), and proteins/albumin, in the following proportions (you can change the total amount if you want, just be sure to keep the proportions the same). If you’d like an extra level of challenge, don’t peak and figure out for yourself how much should go into your model by looking up the concentrations of each on the internet and converting the units appropriately.
|
3. Add each component of your blood mixture in the following proportions, by volume:
|
4. Shake well to mix!
5. Save this for later: you’ll need it for another activity later in the unit.
5. Save this for later: you’ll need it for another activity later in the unit.
Activity 2: Pumping Blood
As important as your blood is, it can’t do its job without the heart pumping it everywhere it needs to go. The strong musculature of the heart forces blood out to every cell in the body. When it’s done its job and delivered nutrients and oxygen to your cells, veins then bring this blood back to the heart (with the help of some squeezing from your muscles and some valves in your veins). Before it goes back to the body, though, this blood is pumped to the lungs, where carbon dioxide is dropped off and fresh oxygen is pumped up. Then, blood goes back to the heart and back to the body.
Don’t get confused: While any given particle in your blood is either in body circulation or lung circulation at any given time (blood can’t be simultaneously on the left side and the right side of the heart), considering all of your blood, you always have some at every phase of circulation: some going to the body, some traveling back, some going to the lungs, and some coming back to the heart. So, when your heart pumps, it pumps to the lungs and the body at the same time.
Don’t get confused: While any given particle in your blood is either in body circulation or lung circulation at any given time (blood can’t be simultaneously on the left side and the right side of the heart), considering all of your blood, you always have some at every phase of circulation: some going to the body, some traveling back, some going to the lungs, and some coming back to the heart. So, when your heart pumps, it pumps to the lungs and the body at the same time.
This activity will have you build a simple system to show how the muscular contraction of the heart forces blood to the body and the lungs.
materials
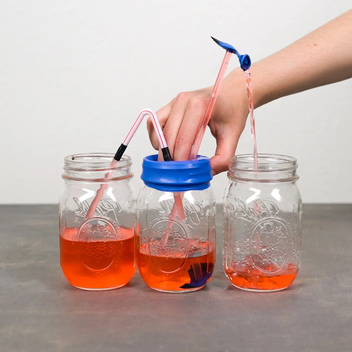
- 3 plastic water bottles or squeeze bottles, at least one of which should have the cap. If you’d prefer, you can also use jars with a latex balloon fit over the top like a drum.
- Several plastic straws or flexible tubing.
- Water (enough to fill your first water bottle at least half way)
- Food coloring (optional). You can use red if you want it to look like blood.
- A drill or ice pick to drill a holl in the top the bottle cap.
- Hot glue or superglue is helpful but not absolutely necessary.
Procedure
1. Drill two holes into one of the bottle caps, large enough to fit the straw tightly through. Always use caution and get the permission of your relevant responsible adult before using tools. Alternatively, fit the latex balloon over the glass jar. You may wish to secure the balloon in place with masking tape or duct tape.
2. Fit two straws through each of the holes in the cap lid. You may wish to secure them in place and fill in any gaps with glue. Alternatively, poke the straws through the latex balloon.
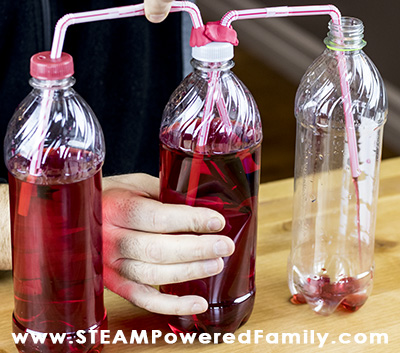
3. Secure the cap with the straws in it to a bottle that’s approximately half full (or more) with water (with or without food coloring). The ends of the straws should be submerged in the water.
4. Bend the straws so that one goes into one water bottle and the other goes into the second. You may find it helpful to fit one straw into another straw to make it longer. You may also find it helpful to drill a hole in the cap of each of the other two bottle caps to secure the straws in place rather than just leaving those bottles open.
5. Your final structure should look something like this:
2. Fit two straws through each of the holes in the cap lid. You may wish to secure them in place and fill in any gaps with glue. Alternatively, poke the straws through the latex balloon.
3. Secure the cap with the straws in it to a bottle that’s approximately half full (or more) with water (with or without food coloring). The ends of the straws should be submerged in the water.
4. Bend the straws so that one goes into one water bottle and the other goes into the second. You may find it helpful to fit one straw into another straw to make it longer. You may also find it helpful to drill a hole in the cap of each of the other two bottle caps to secure the straws in place rather than just leaving those bottles open.
5. Your final structure should look something like this:
|
|
6. Squeeze the middle water bottle or push down on the latex balloon to “pump” blood to the heart and the lungs. The force of your hand squeezing represents the force of the muscular contraction of the heart.
Challenge Activity: Dual Circulation
Note: This activity is meant as a challenge of critical thinking and engineering skill. We encourage all students to attempt it, but don’t get discouraged if your best effort doesn’t work perfectly. It’s most important that you’re thinking about blood flow/dual circulation properly and trying your best to replicate that in your model.
As you have learned, actual heart contraction is just a bit more complicated than the way you modeled in the last activity. Real heart contraction involves dual circulation to the heart and lungs, keeping the oxygenated blood and deoxygenated blood separate, with blood going to the lungs and then back to the heart before being pumped back to the body. The blood then returns to the heart to go to the lungs and just keeps circulating.
For your next challenge, create a more accurate model of heart contraction than the one you made in Activity 2. You can continue to use water bottles and straws, or you can use any other materials that you may prefer. Your goal is to effectively replicate dual circulation in a closed system that pumps blood to the lungs, then back to the heart, then to the body, and then back to the heart. Avoiding leaks is also ideal.
Good luck!
If you build a working system, or if you’re having fun, we want to see it! If you have an Instagram and the permission of your relevant responsible adult, share with us @eons_learning, #HeartEons.
Longitudinal Activity: Making a Model of the Human Body
Add the heart and some major blood vessels to your model of the human body. You can use the one you made in your challenge activity, or, if you have a design that you’re already set on, you can make that instead.