The Atmosphere: EIS 15
Activity 1: Let's Go Fly a Kite!
Beyond being important for, you know, sustaining life, the atmosphere’s density makes it a lot of fun to hang out in (literally). It’s density is low enough to walk through, fall through, and jump through, but just high enough that, with enough surface area around us, we can float on top of it and FLY! A nice gust of wind will also give us an extra boost of air buoyancy to make staying in the air easier. Because of this nice balance of density and wind, there are all sorts of cool things you can do in the air: parachuting, hang gliding, flying airplanes, taking a hot air balloon, waving to the birds, and doing lots of other things that are terrifying if you’re afraid of heights. Down here on the ground and at sea we can enjoy air density in other ways: sailing, windsurfing, enjoying a nice breeze in the summer sunshine, and (a personal favorite) flying kites!
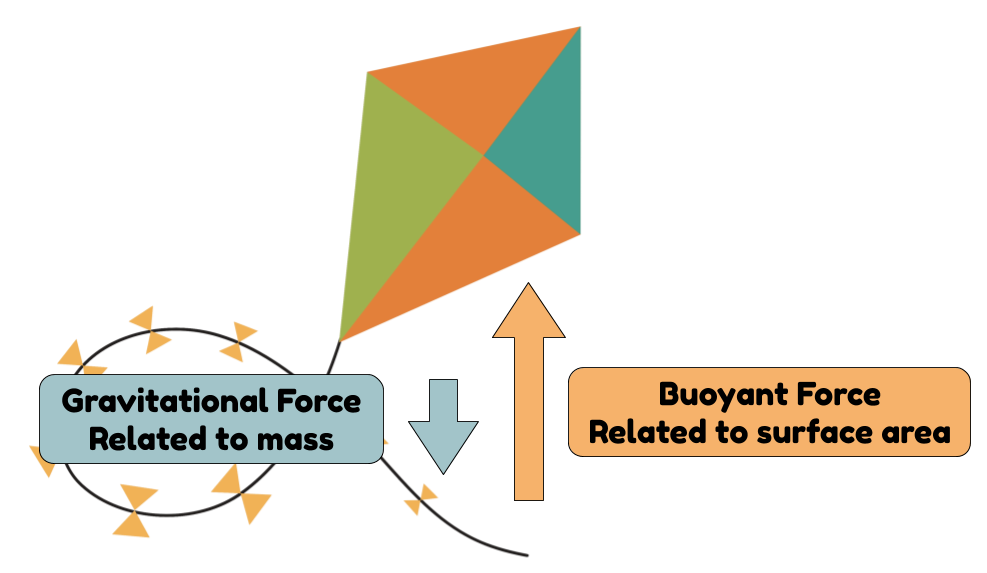
Flying a kite really operates on the same principles as flying an airplane (or parachuting, or hang gliding). The goal is to stay up in the air as long as possible. In order to do that, the downward pull of gravity must be less than the upward push of buoyant force.
To review our density sink-or-swim activity back from chemistry, buoyant force is what keeps things from sinking, either through air or water. If you’ve ever been swimming, you’ve felt buoyant force: it is the water molecules pushing you up. The more surface area you have, the more water molecules will be pushing you up. That means more force pushing up! The buoyant force also increases with density (of the air/water). This has the same effect as surface area: by squishing more air molecules into the same amount of space, you know have more air molecules pushing something up. The force of gravity has to do with mass: more mass = more gravitational force. So, lighter things have less force pulling down.
|
|
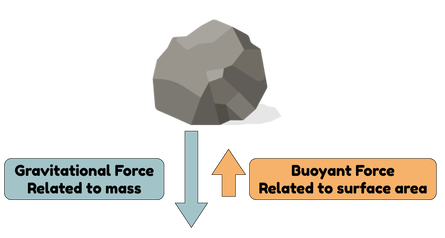
Paper beats rock! (at flying)
(If you really want to know, buoyant force occurs because pressure gets higher as you go deeper in a fluid like water or air. That’s because there is more fluid pushing down on it from above, squishing the molecules together. Because of this, there will be more pressure pushing up on the bottom of, say, your swimming body than the top of it. So, the net pressure--that is, the upward pressure minus the downward pressure--is upward. Pressure is just force divided by the surface area. So, bigger surface area with the same pressure means more upward force! Yay, physics!)
So, without much further ado:
Let’s Go Fly a Kite! Up to the highest height! Up to the ATMOSPHERE! Up where the air is clear! Let’s Go….. Fly a Kiiiiiiiiite! (That would be Disney’s Mary Poppins, ladies and gentlemen. I will take my applause now.)
So, without much further ado:
Let’s Go Fly a Kite! Up to the highest height! Up to the ATMOSPHERE! Up where the air is clear! Let’s Go….. Fly a Kiiiiiiiiite! (That would be Disney’s Mary Poppins, ladies and gentlemen. I will take my applause now.)
Materials
- Paper or fabric (of your choosing). Some types to consider:
- Tissue paper
- Printer paper
- Construction paper
- Cardstock
- Wrapping paper
- Poster paper
- Cardboard
- Newspaper
- Fabric
- Etc.
- Rod supports. Some types to consider:
- Wooden dowel rods
- Pencils
- Straws
- Sticks
- Metal dowel rods
- Cardboard
- Etc.
- String. This must be long enough to hold onto your kite (usually at least 20 feet)
- Something to hold it all together. For example:
- Tape
- Glue
- Additional string
- Staples
- Etc.
- Any decorative flourishes you want (optional).
Procedure
1. Design your kite. Consider the requirements for flight as you’re making your design. Draw your design out on paper. We recommend drawing multiple designs and choosing which one to build once you have several ideas, but this is not required.
This is a classic kite design:
This is a classic kite design:
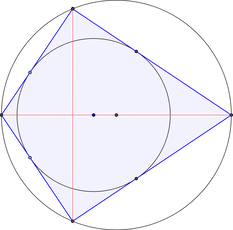
We encourage you to think creatively and critically about your kite design, but you are also welcome to stick to tried-and-true-methods (note that it does take some skill and precision to get the exact geometry down, though).
2. Decide what materials to use for your kite. Consider availability (do I have this around my house? If not, can I get it easily?), cost, and effectiveness (will my kite fly if I use this material?). If you’re using something from around the house, check to make sure it’s okay for you to use.
3. Build your kite, according to your specifications. Be sure to attach a string to the bottom of your kite so you can fly it! You’ll want to be sure the string is attached very securely.
4. Take a picture of your kite. Do this now because it might get ruined when you fly it.
5. Fly your kite. This works best on a slightly windy day in an open area without a lot of trees or buildings. To fly a kite, wrap the string around your hand in circles and hold on tightly. Then, push the body of your kite into a gust of wind. As your kite starts to fly, start unwrapping the string a little bit at a time to give it a longer “leash”. You can unwrap it up to the point that you’re just able to hold on tightly. You can pull back to get more control (This is especially important if you’re around trees: you don’t want your kite to get stuck).
6. Count how long your kite is able to stay in the air. You can use a stopwatch if you want. The time doesn’t have to be exact, but it should be a good rough estimate. Try flying it a couple of times to see if it stays up longer.
If you’d like, consider what was good and bad about the design of your kite. Then, design and build a second kite based on what you’ve learned. Repeat all the other steps.
If you build a kite you love, we want to see it! If you have an Instagram and the permission of your relevant responsible adult, share a photo or video @kast_edu, #KitesKASTEdu
Activity 2: Being a Citizen of Your Environment
We encourage you to find or start a local project in your area and get involved with taking care of your environment. This can be as simple as getting outside and cleaning up your nearest park, possibly with a few friends, or can be as elaborate as getting involved with a youth advocacy group promoting political change around climate laws. There are many options in-between! For example:
And many more!
If you’re doing something meaningful that you love, we want to see it! If you have an Instagram and the permission of your relevant responsible adult, share a photo or video @kast_edu, #EarthDayEveryDay
- Creating art or a useful engineered product out of upcycled (trash) items.
- Planting trees or becoming involved in a gardening project.
- Start a home-compost system or visit a local recycling plant to learn about recycling.
- Participate in a park conservation or park clean-up event.
- Fundraise for a climate organization that does good.
- Get involved in a climate organization that does good.
- Learn about career paths in green energy, environmental regulation, and engineering.
- See what it takes to go zero-waste for a day (or a week!)
And many more!
If you’re doing something meaningful that you love, we want to see it! If you have an Instagram and the permission of your relevant responsible adult, share a photo or video @kast_edu, #EarthDayEveryDay
Bonus Activity: Solar Energy
In this lesson, we talked a lot about the ways that burning fossil fuels is bad for our environment. Fossil fuels, like gasoline, oil, and coal, are common sources of energy, and burning them releases the greenhouse gas carbon dioxide into our atmosphere. Greenhouse gases, like carbon dioxide, cause climate change. Switching to green energy sources, like wind, solar, water, and nuclear power is one important step in slowing climate change and reversing the damage it has caused.
This video will teach you more about green energy sources:
This video will teach you more about green energy sources:
You may have heard of solar power before, and you may have even seen solar panels in action. But, did you know that you can make your own solar panel right at home?
Note: this activity requires some supplies that are not found in every household. It is not a required activity, but can be a fun way to learn about alternative energy—and recycling those old CDs!
Materials
- 1 CD (that you no longer want). You may scale up this activity to make more solar panels with more CDs, which will provide more power.
- Approx. 3-4 feet of copper wire. This can be easily and inexpensively acquired at most hardware stores or online. Anywhere between 20 and 30 gauge should work well for this activity. You may wish to have extra on hand.
- 3 Zener diodes. These are commonly sold in electronics supply stores (such as RadioShack) and may be found at certain hardware or hobby supply stores. They are easiest to find online, such as on Amazon.
- Super glue or hot glue.
- Soldering iron. You may find it possible to do this activity without one, but it is easiest with one. These are commonly found at hardware stores, hobby supply stores (check the jewelry section), or online. Soldering irons are very hot and caution should be exercised. The supervision of your relevant responsible adult is recommended.
- LED light bulb. The lower the voltage, the more easily you will see the effect. Flashlight light bulbs are recommended.
- An old cell phone charger (optional). This should be a phone charger that you don’t mind ruining.
Procedure
This video will be helpful to you in going through the procedure:
If you get your CD solar panel to work, we want to see it! If you have an Instagram and the permission of your relevant responsible adult, share with us @eons_learning, #SolarPanelEons
- Cut 3-4 12-inch pieces of copper wire (the exact amount you need will depend on how tightly it is coiled).
- Strip the ends of your copper wires.
- Wrap your first copper wire around the shiny side of your CD, making zig-zaggy U-bends as you go. This will somewhat resemble a flower around the center of your CD. Glue down the copper wire as you go with super glue or hot glue. Ensure a good connection between the CD and the copper wire. This should cover ¼ to ⅓ of the CD face.
- Leaving a small gap between each set of coils, repeat step 3 for your remaining copper wires.
- Connect the stripped ends of copper wire using a Zener diode. This is most easily done with a soldering iron, but you may be able to get an adequate connection by tightly twisting the end of copper wire several times around the Zener diode. Leave one gap unconnected—this is where you will be attaching your lightbulb.
- Either using additional copper wire or simply by connecting the existing ends of copper wire to the lightbulb, wrap one end of copper wire (connected to one of the final, unconnected stripped ends that is attached to the CD) around the metal base of the lightbulb. Connect the other end of copper wire to the bottom flat metal part of the lightbulb. You can do this either permanently, as shown in the video, using hot glue, or you can simply tap the end of copper wire to the bottom of your lightbulb. If you are familiar with integrating switches into circuit boards, that is another option.
- Set your CD solar panel out in the bright sunlight. Are you able to light your lightbulb?
- If your lightbulb works and you have a spare phone charger that you’re willing to part with, cut the phone charger so that the wire is exposed. Connect the spare bits of copper wire on your CD solar panel (in place of the lightbulb) to the exposed wire on the phone connection half of the phone charger. Then, set your CD solar panel out in the bright sunlight and try to charge your phone with it! Some phones require more power than a single CD solar panel can provide, but this works well for others. You may also consider making more CD solar panels (all connected with the same copper wire and additional Zener diodes) to get more power to charge your phone.
If you get your CD solar panel to work, we want to see it! If you have an Instagram and the permission of your relevant responsible adult, share with us @eons_learning, #SolarPanelEons